
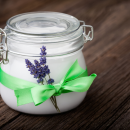
How to Use Coconut Oil For Your Beauty Routine
How to Use Coconut Oil For Your Beauty Routines If you don’t already know…I love coconut oil. Love it! I keep finding more uses for coconut oil, which makes me quite happy! Check out how coconut oil can be used for your beauty routine. Night Cream My sister, who has been a licensed Esthetician for almost ten years, was the first to recommend coconut oil as a night creme. The antioxidants are great for smoothing fine lines and wrinkles while you sleep. Apply coconut oil to your face at night for amazing moisturizing benefits. I personally use coconut oil as a night cream and I absolutely love it. Talk about an effective (and cheap!) Under-Eye Cream! Just remember that a little bit goes a long way! Makeup Remover You can dab a cotton ball will coconut oil and easily wipe off your makeup. Rinse your face...
Read More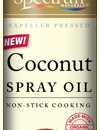
Coconut Spray Oil by Spectrum®
I love spray oils for a lot of reasons. With spray cans, you end up using less oil. It’s great for greasing pans. It’s easy, and you don’t need to use any extra utensils. The problem with spray oils? A lot of spray oils available on the market today use vegetable oil. You know how I feel about that, right? I recently found Spectrum’s Coconut Spray Oil, which is made with organic refined coconut oil and is naturally expeller-pressed from organically grown coconuts. This is fantastic news because I love coconut oil! This spray oil has a clean and natural flavor, and it’s great for multiple uses. Need to cook eggs? Just spray the pan! Need to bake muffins? Spray the little tin cups! This is a wonderful find, and I hope you are as excited as I am! (I seriously wish...
Read More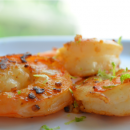
Tiger Prawns with Lime Zest
A lot of people enjoy Tiger Prawns at restaurants (or any shrimp for that matter), but they don’t feel confident in making their own dish at home. My brother (who is an amazing cook!) was visiting me for a couple of days and was the inspiration for this superb dish! I made a few changes to his original recipe (buh-bye butter!), but I must give credit where credit is due. Thank you Eli! Here’s a gourmet tasting dish that is an extremely simple recipe anyone can follow. Ingredients: 2 lbs raw Tiger Prawns 1 tbsp Coconut Oil 1 tbsp Minced Garlic 1/4 tsp Sea Salt 1 whole Lime (you will need lime juice and zest) Instructions: Step 1) Remove the shells and de-vein the tiger prawns. Sometimes you will notice a black vein that runs across the back of the shrimp...
Read More
Banana Pancakes
I love buying extra bananas just to let them “go bad” – it’s the perfect excuse to make delicious recipes like banana nut bread or banana pancakes! I made these pancakes recently, and thought I would share this easy recipe with all of you. Ingredients: 1 cup Whole Wheat Flour or Gluten-Free Flour Blend 1/4 tsp Sea Salt 2 tsp Baking Powder 1 cup Raw Milk or Rice Milk 1 large Egg 2 tbsp melted Coconut Oil 2 ripe Bananas, mashed Instructions: Step 1) Mix the milk, egg, melted oil, and bananas and beat well. Step 2) Mix in the flour, salt, and baking powder. Batter will be slightly lumpy because of the bananas. Step 3) Heat skillet to a medium-low heat. Put coconut oil on the pan to prevent the pancakes from sticking to the pan. Scoop about...
Read More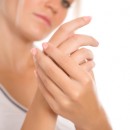
Treatments for Dry Skin
There are several reasons you can end up with dry skin. Depending on the severity of your dry skin, you can end up with the ever annoying itchy skin or sadly suffer from cracks and bleeding skin. I’ve listed some some easy ways you can naturally treat your dry skin, and if you have cracked or dry skin…please act sooner rather than later. Lather up Dry skin can be easily relieved by lotion or aloe vera gel (known fact, right? Read on…). Lotion is an immediate relief to dry skin, but it doesn’t necessarily resolve the underlying issue. It’s important to find a lotion that is all natural and paraben-free. The only way to know if your lotion of choice is really safe is to read the labels. Stay Hydrated A sign of dehydration is dry skin, so be sure to...
Read More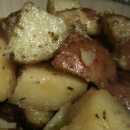
Rosemary Potatoes
Ingredients: 15 Red Potatoes 3 tablespoons Coconut Oil Garlic Powder Sea Salt Rosemary Instructions: Step 1) Preheat oven to 350 degrees. Step 2) Cut potatoes into cubed pieces (see photo), and put into glass casserole dish. Step 3) Place chunks of coconut oil throughout potatoes. Step 4) Add garlic powder, sea salt, and rosemary to potatoes. Step 5) Bake for 90 minutes (covered), or until potatoes are soft. Notes: This is probably one of my favorite dishes. I am pretty sure I would rather have these potatoes than any “candy” out there. These are guilt-free, easy to make, and absolutely delicious! Feel free to follow us, however you...
Read More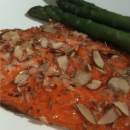
Salmon Almond Crunch
Ingredients: 3 tablespoons Mustard 3 tablespoons melted Coconut oil 5 teaspoons Raw Honey 1 slice Ezekiel bread crumbs 1/2 cup Almond slices 2 teaspoons dried (or fresh) Rosemary 2-4 Salmon fillets Instructions: Step 1) Preheat oven to 400 degrees and lightly grease baking pan. Step 2) In a bowl, combine the mustard, melted coconut oil, and honey Step 3) Place fillets on baking pan. Spoon on the mustard mixture to each fillet, then top with bread crumbs, sliced almonds, and rosemary. Step 4) Bake for 20 minutes (or 10 minutes for each inch of thickness, measuring thickest part of the fillet). Salmon should flake when done. Notes: Salmon is a perfect healthy dinner for you and the family. I always try to season my meats in a healthy way, and that’s why I chose Coconut oil (rather than another...
Read More
3 Easy Tips on how to be Healthier today
You can be skinny in a number of different ways. To narrow it down, you can become Skinny by doing unhealthy things to your body (diet pills, drugs, anorexic, etc), or you can become Skinny by being Healthy (excercise, eating healthy, etc). I try to focus my efforts on being healthy, which in the end is what is going to help my body resist deseases, illness, fatigue, depression- and be “Skinny”. From my own observations, here are a couple of things you can get in the habit of, to help you become more healthy. 1) Replace your Soda with Water The average 12 oz can of regular Soda has about 150 calories in it. Multiply that by how many cans of soda you drink aday, and it adds up. Even if you are drinking “diet” soda with 0 calories,...
Read More